Personal account
This book describes the nuances of server management, payment, and security of your account.
- Servers
- Reconfiguring a virtual server
- Server management
- Disk extension
- IP addresses and rDNS
- OS installation
- Payment and Renew
- Snapshots and backups
- Finance
- Bonuses, discounts and affiliate program
- Balance
- Payment Methods
- Cost of VPS resources
- Server cancellation
- Security and Notifications
Servers
This chapter describes direct server management.
Reconfiguring a virtual server
In your account when changing the configuration, the following rules apply:
- The configuration of any server can be changed at any time;
- An increase in all resources can be done on the fly without shutting down the server and operating system;
- To reduce the number of processor cores and the amount of RAM you need to turn off the server;
- To increase the disk after payment in your account, you need to extend it in the operating system itself - for this, follow instructions depending on your operating system.
- ATTENTION! Reducing disk SSD space is IMPOSSIBLE, due to the specifics of virtualization systems;
- You can reduce an additional HDD ONLY by deleting all files and creating a new smaller disk. To do this, contact technical support;
- When resources are reduced, funds paid are returned to the internal balance;
- With an increase in resources, a surcharge is charged equal to the difference in the cost of configurations for the remaining period.
So, you can change the configuration of your virtual server by clicking the button " ![]() Change configuration" in the menu indicated in the screenshot:
Change configuration" in the menu indicated in the screenshot:

Next, use the sliders to change the characteristics of the virtual server to the desired ones, and click the "Apply" button. If you have increased resources, then you will be asked to pay extra for the added configuration (the remaining time of the paid period). If you have reduced resources, then unused funds of the paid period will automatically be credited to your internal balance.
Server management
In the server’s main menu you can see the current server configuration, service control buttons, graphical display of the server’s resource use, network information - traffic graph, main and additional IP address, speed of the connected Internet port.
Control buttons
 Power on / Power off
The server is turned on or off completely, to prevent accidental clicking there will be an additional dialog box where you need to confirm the action;
 Suspend
only for virtual servers
An analogue of the "Sleep" mode on Windows, the entire server is paused;
 Restart
Short-term shutdown and instant turn on of the server, additional confirmation also pops up;
 Web-console
This is the remote monitor of your server, where you can see everything that happens as if your monitor is connected to the server directly. You can also use your mouse and keyboard here. We want to pay attention that the keyboard layout should be only English. The clipboard CTRL + C and CTRL + V does not work here. This function is mainly used for simple and quick actions, for full work you need to use the SSH client (for Linux systems) or the RDP client (for Windows systems);
 Disconnect network
Disconnects your server from the Internet, can be used at any time;
 OS installation
With this function you can reinstall the operating system on the server in a few clicks, this is a fully automated process, you only need to select the desired OS and additional software provision (if necessary). ATTENTION, when reinstalling the operating system, ALL data on the server will be deleted;
 Services
Here you can buy the necessary services if you did not buy them when ordering. At the moment, “1 Gbps port speed” is available here, Windows Server license, Weekly backup and Daily backup;
 ISO images
Here you can download and connect your ISO-image of the operating system to the server . After rebooting, the server will automatically boot from this image. Also, do not forget to disconnect the image from the server after installing the system, since it will always be loaded from it.
 Snapshots
for virtual servers only
This is a snapshot function of your server at a given time. That is, you can return the server status to the time of the recovery point. Very convenient function when you test something on the server and in case of "breakdown" you can return. Please note that these copies are stored for 12 hours, then deleted. More about snapshots and backups here .
Disk extension
After adding and paying for additional disk space for your server, you must extend it directly in the operating system itself. Depending on the type of system, there are the following instructions:
for Linux systems
At the command prompt, just run
wget -qO- grw.sh | bash
then you will see the result of the successful extension.
To check the updated disk size, run
df -h /
For OS automatically installed since August 2024, this does not need to be done; disk space is increased automatically.
for Windows OS
You need to follow these steps:
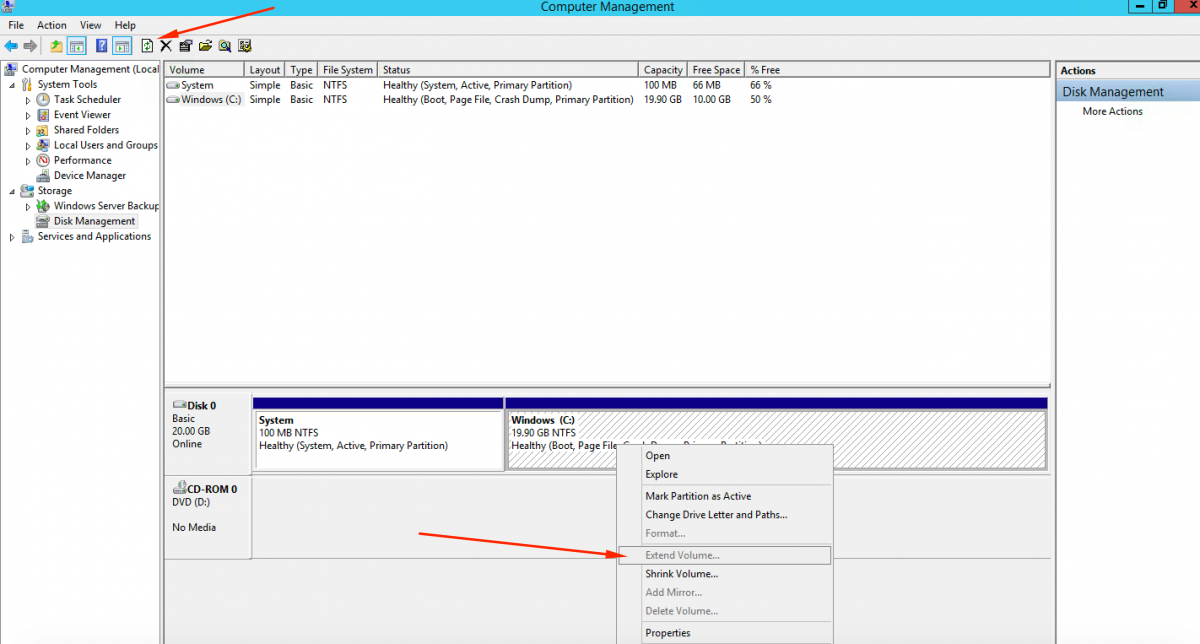
- Go to this chain "Start" - "Control Panel" - "System and Security" - "Administrative Tools" - "Computer Management"
- Next, select the "Disk Management" section in the side menu
- In the diagram with disks, right-click on drive “C” and select “Extend Volume” in the menu (if this item is not active, refresh the page using the "Refresh" button in the top menu, see screenshot below)
- In the next steps, select "Next" and "Ok", nothing else needs to be changed.
IP addresses and rDNS
When ordering a new virtual or dedicated server, two free IP addresses are included in the server price by default. If you need additional addresses, they can be ordered in your account, the cost is $1/month for each IP.
The maximum number of IP addresses per server varies in each location depending on the number of free addresses.
Allocation of IP addresses can be adjusted using following rules:
- in a sequential order if possible;
- from different subnetworks;
Configuring additional IP addresses
All ordered IP addresses can be configured on the network interface automatically by checking the "Configure all IP addresses on the network interface" checkbox.
If you want to do this later, or you ordered additional IPs after installing the operating system, then you can use the "ipadd" utility (included in the software package on all our Linux operating systems). Using "ipadd": enter this command and then a list of addresses that you need to configure separated with a space, then press Enter, for example:
ipadd 192.168.1.1 192.168.1.2 ...Where 192.168.1.1 and 192.168.1.2 are your IPs.
rDNS
Adding an rDNS record (PTR) can be done in your account, just click on the button "List ![]() ", as indicated in the screenshot below
", as indicated in the screenshot below
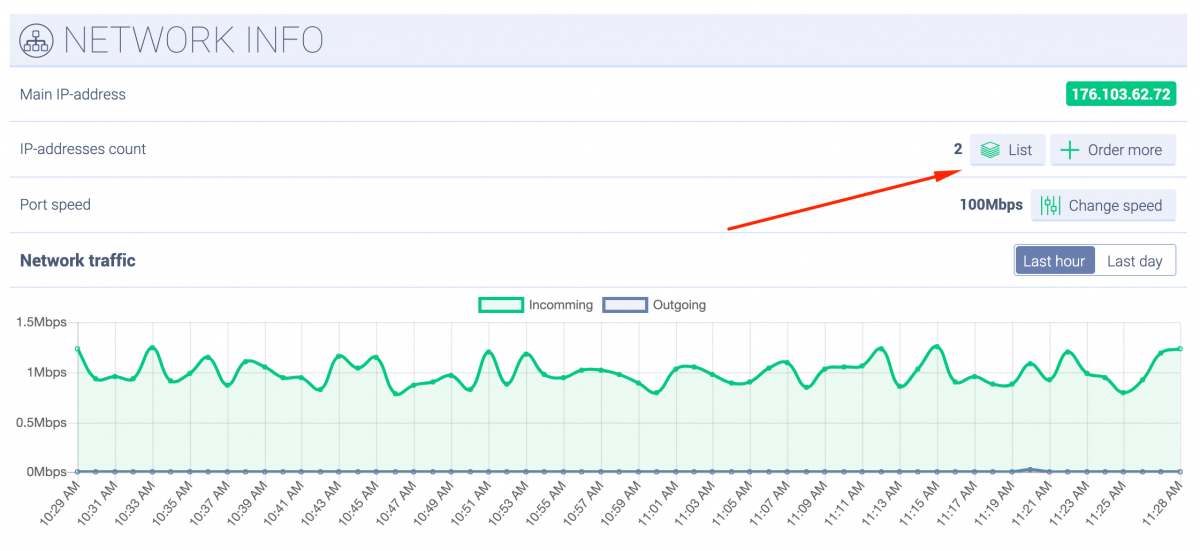
Next, enter your PTR records for the necessary IP in the appropriate field and finally save the page.

You can also change the primary IP address on this page, but please note that this change only occurs in your personal account, the primary address does not actually change on the server, you must change it yourself in the network interface settings, or contact our technical support.
OS installation
Automatic installation
Initially, all of our servers do not have a pre-installed operating system. Immediately after paying for the selected configuration, you will be asked to install the OS from the available menus. Installation is fully automated and does not require additional steps from you. After starting, you will see the installation progress, and upon completion, access data (IP, login, password) will be sent to your email.
Install from your image
If you want to upload your image of the operating system, then when ordering the server, check the "Do not install OS" box. Next, in your account on the server management page, you need to download the image.
To do this, click the ![]() "ISO images" button, then the "Upload" tab and select the desired image from your computer there. After the image is downloaded, just mount it right there, in the "Manage" tab, to do this, select the desired image and click the "Insert" button.
"ISO images" button, then the "Upload" tab and select the desired image from your computer there. After the image is downloaded, just mount it right there, in the "Manage" tab, to do this, select the desired image and click the "Insert" button.
Now, to boot the operating system from this image, just reboot the server and in ![]() "Web console" you can observe the start of installation of your system. Also, do not forget to eject this image after installation by clicking the "Eject" button in the ISO control menu, since after rebooting from this image, the installation will restart.
"Web console" you can observe the start of installation of your system. Also, do not forget to eject this image after installation by clicking the "Eject" button in the ISO control menu, since after rebooting from this image, the installation will restart.
Payment and Renew
When ordering a new service, the first payment is made for at least one month, then you can make a payment multiple of one day, that is, from one day to one year.
If you pay for the service in one payment for a longer period than one month, we provide discounts,when ordering for:
- 2 months - 3% discount
- 3 months - 5%
- 6 months - 10%
- 12 months - 15%.
Our billing system provides a PAYMENT DEFERRAL, if for some reason you do not have the opportunity to renew the server on time.
Snapshots and backups
For virtual servers in our infrastructure, the option ![]() "Snapshot" is available.
"Snapshot" is available.
This feature provides a snapshot of your server’s hard drive. Due to the fact that physically the data is not copied anywhere, and the bit-by-bit state of the disk at a particular moment in time is simply remembered, you can either get an instant backup and roll back to that copy very quickly if necessary.
But this approach has its drawbacks, because of the peculiarities of the implementation, we can afford to store these copies for only 24 hours. Therefore, we recommend using these copies immediately before risky changes on the server, for example, before updating the software or changing the settings / installing new server software.
Our infrastructure runs the classic backup of all virtual machines and all locations. These backups are made exclusively within our infrastructure and are not available for download by the customer due to technical limitations. In order to rollback the server from a backup, as well as find out the dates when backups were made, you need to click the ![]() "Backups" button on the server management page, select the required restore point there and click the "Restore server" button.
"Backups" button on the server management page, select the required restore point there and click the "Restore server" button.
Finance
Bonuses, discounts and affiliate program
When paying for our services for a long period or "wholesale", we offer the following instant discounts:
Long-term subscription
The discount is provided depending on the period for which the server will be paid in one payment.Paying the server in one payment using any payment system including internal balance, you get:
- 3% discount when paying for 2 months
- 5% discount when paying for 3-5 months,
- 10% when paying for 6-11 months
- 15% when paying for 12 months.
This discount applies to any of our virtual and dedicated servers.
Wholesale orders
The discount is provided depending on the number of servers used in your account.
- If you have 5 to 9 active servers, you get a 5% discount on each next server
- from 10 to 14 servers - 10% discount
- from 15 or more servers - 15% discount.
This discount applies only to computing resources, that is, processor, RAM and disks. Discounts for additional services - IP-addresses, gigabit port, licenses are not provided.
Bonuses
You can also earn an additional discount using bonuses, they can be obtained in two ways:
Loyalty program for regular customers.
Bonuses are awarded for your loyalty to our company, if you use our services:
- for 1 year, you get 1% bonus on any payment on our service,
- 2 years - 2%,
- 3 years - 3%,
- 4 years - 4%
- 5 and more years -5% bonus.
Referral program
The affiliate (referral) program consists in attracting customers (referrals) to use our service using a unique referral link (the attracted client must register in his personal account by clicking on your referral link).
This link can be copied in your account on the way - "Settings" - "Finance". For each referral payment of your services, you get:
- 10% bonus when paying for dedicated servers and
- 15% when paying for virtual servers.
How to use bonuses
There are the following rules for calculating and using bonuses:
- bonuses are credited to the bonus balance;
- when paying for services, bonuses are first spent, and then funds from the internal balance;
- bonuses can pay for all our services;
- the validity of bonuses is unlimited;
- bonuses cannot be withdrawn to a bank account in cash.
Balance
The internal balance is very convenient to use for the automatic extension of your services. There are such options for customizing this function:
- Auto-renewal can be globally turned on or off in your account in the "Settings" - "Finance" section (off by default);
- Auto-renewal can be selected in multiples of 1 day or 1 month;
- if you have several servers, you can choose for which of them auto-renewal will be enabled; As indicated below
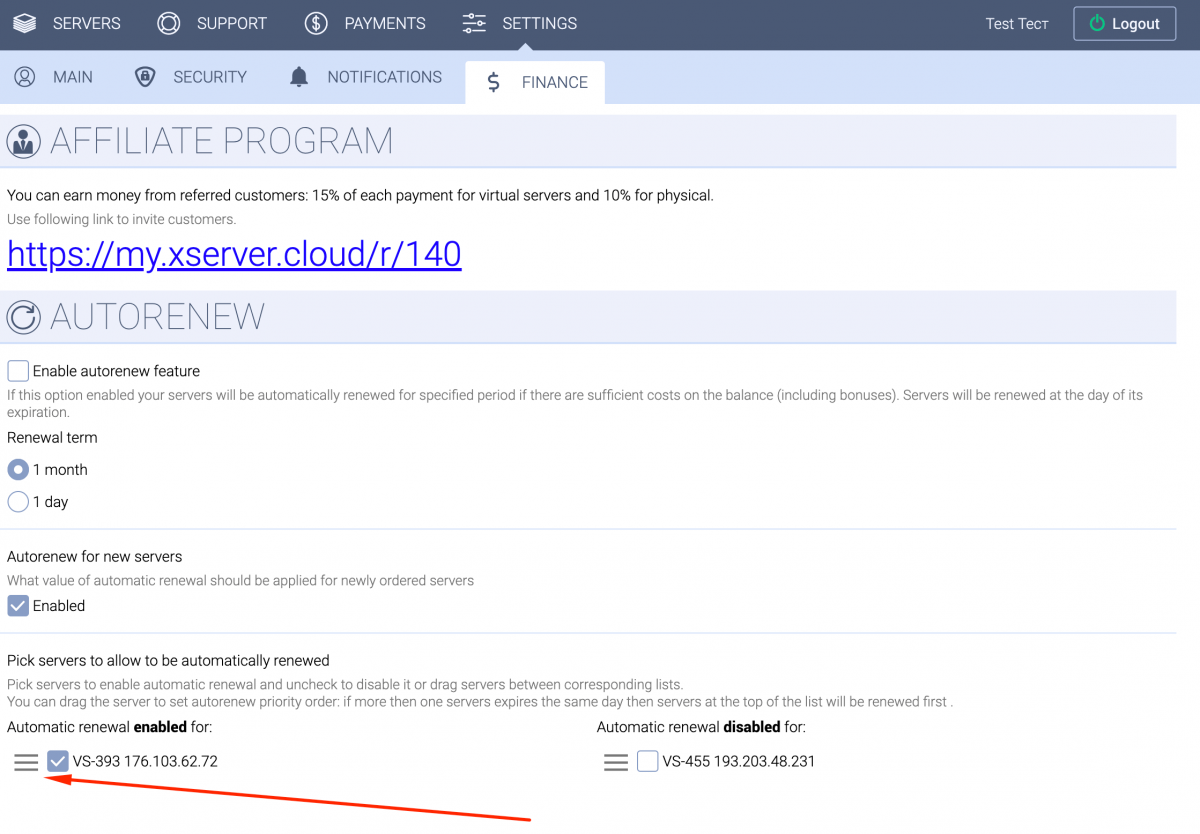
- You can set auto-renewal priority by dragging servers in the list. First of all, the server that is higher in the list will be renewed.
- Server validity period will be extended on the day it ends and if funds are available on the bonus or internal balance.
- The internal balance can be replenished with any sum and any of the payment systems available in personal cabinet, the minimum payment amount is $ 1.
Payment Methods
In our service, we tried to implement the most diverse payment methods. Now our services can be paid in the following ways:
- PayPal;
- Visa/Mastercard, as well as ApplePay and GooglePay;
- Whitepay is a payment aggregator that allows you to pay in many ways. They support more than 200 digital assets, including BTC, ETH, USDT;
- EU bank transfer SEPA;
- Bank transfer.
Cost of VPS resources
The tariff structure of a virtual server depends on the amount of resources used - the number of processor cores, the amount of RAM, and the amount of SSD and HDD disk. For transparency in understanding pricing, the cost of each of these components is listed below.
- 1 processor core - $ 2.75 / month
- 1 Gb of RAM - $ 1 / month.
- 10 Gb SSD drive - $ 1 / month.
- 100Gb HDD drive - $ 2.5 / month.
Based on the selected configuration and the above prices, you get the total cost of renting a virtual server per month.
Server cancellation
If you no longer need the server, you can cancel it so that you no longer need to pay.
Server cancellation rules:
- The server can be canceled at any time starting from the 31st day of use.
- If canceled, the prepayment for the unused period will be credited to your internal balance.
- If the the server is expired, and you have defer a payment, the amount of debt will be debited from your internal balance.*
- It is also possible to schedule an automatic cancellation when the server expires.
* Only if the server has been running for more than two days after the expiration date. For the first 2 days of overdue, no funds are charged.
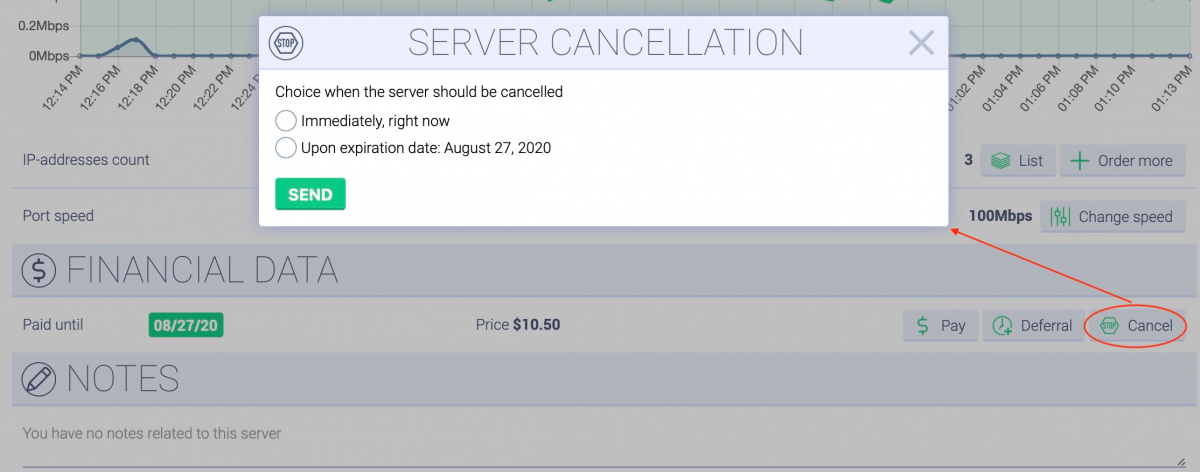
To cancel the server you need to click the "Cancel" button in the "Financial data" block on the server management page, a corresponding window will open.
If a month has not passed since the day of the order, you will have only one option - "Upon expiration date". Otherwise, you can also cancel the server immediately.
This action must be confirmed by E-mail/SMS/Telegram (depending on what is specified in the settings).
If you previously chose to cancel upon expiration date, and then change your mind about canceling the server, reopen this window, check "Remove scheduled cancellation" option and submit the form.
Security and Notifications
Authentification
User ID is an email address.
Two-factor authentication
To increase the security level of your account, you can enable two-factor authentication (hereinafter referred to as 2FA) in the security settings.
What is 2FA?
When you enter your email and password in the login form, you will receive a one-time password via SMS or Telegram, which you must enter to complete the authorization process. To do this, you must first confirm your mobile phone number or Telegram.
SMS
To do this, in the "Settings" section, the "Main" tab, confirm the phone number by pressing the confirm button, then click "send code", having received the code via SMS, enter it in the corresponding field. Now your number is confirmed, and you can enable 2FA in the "Settings" section, the "Security" tab.
Telegram
To activate Telegram, click the XSevrerCloudBot button, confirm your Telegram account, and now you can use Telegram for DFA.
"Smart" login.
This system works when the 2FA is on, the principle of operation is that the system will track your recent successful logins and will not ask for a confirmation code if your IP address and browser match these logins. You can enable or disable this feature, by default it is disabled.
Bind session to IP address.
This login method is that if your IP address changes during the session, you will be automatically logged out. It is recommended to use if you are always logging in with a constant static IP address.
Security question
This question will be asked if you have forgotten your password and want to reset it.
This is one of the security measures if other methods of resetting your password to you for any reasons did not fit. Classic performance as in many other services. You select and write in any question, and also the answer to it. Examples of questions:
- Mother's maiden Name,
- Street name where you grew up,
- Name of the first school,
- Your first pet's name.
Actions confirmation
Confirmation of potentially dangerous activities.
This option protects your servers from accidental clicking on buttons such as Power off, Restart, and Disconnect Network. This is implemented using a pop-up window where you want to confirm the above actions by clicking on the "OK" or "Cancel" button
Installing the OS
Also, to perform actions such as reinstalling the operating system on the server or canceling the server, additional confirmation is provided using a secret code that will be sent by e-mail, SMS or Telegram of your choice.
Settings
You can select the channel to receive the code in the settings, "Security" tab - "Actions confirmation ". After receiving the code, enter it in the required field and click "Confirm".
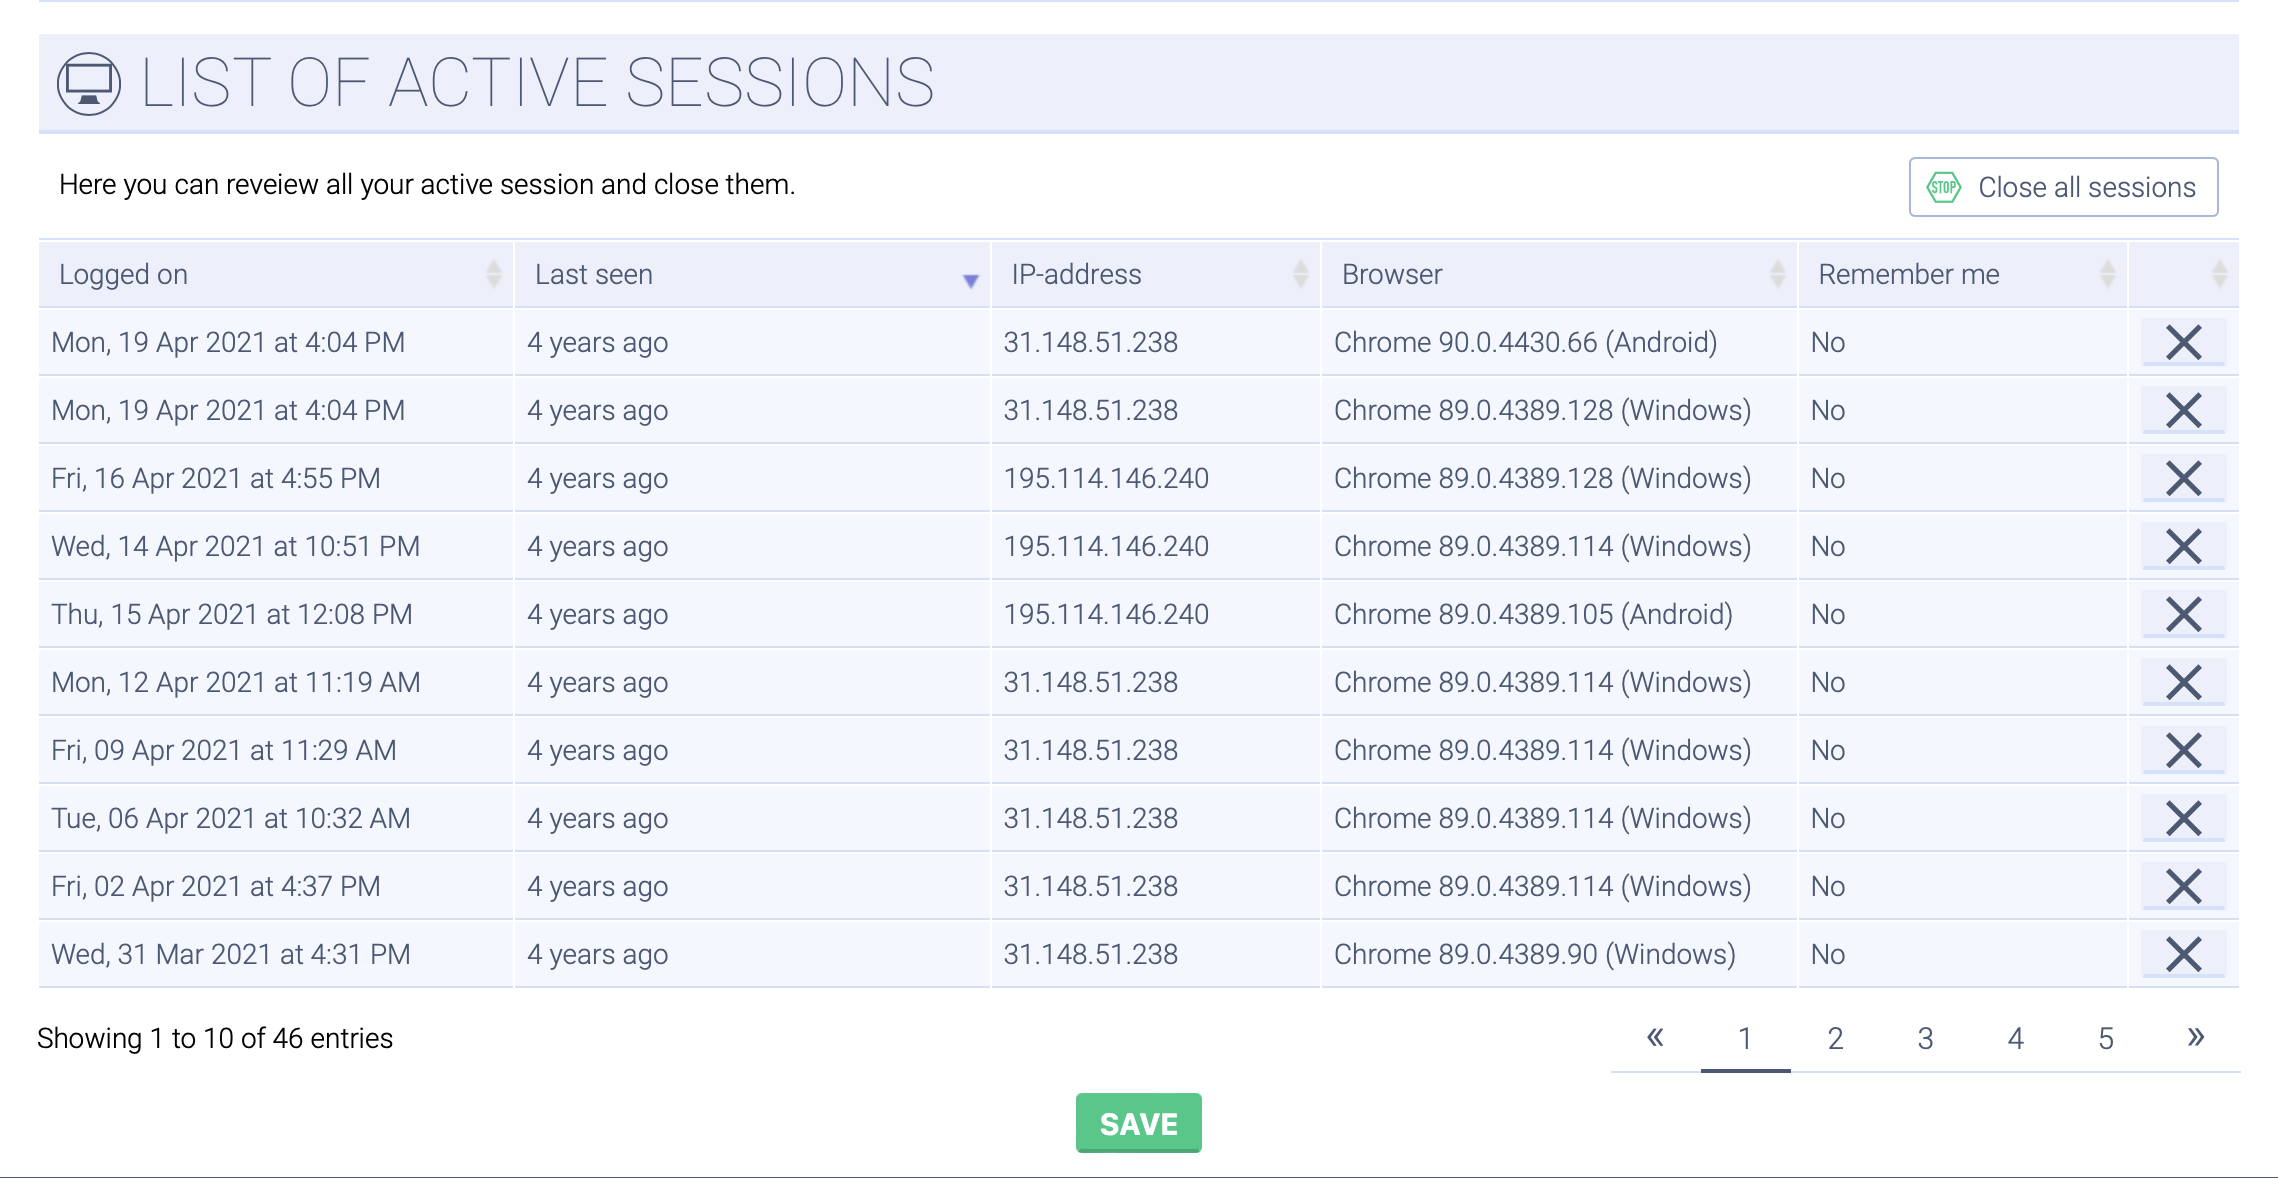
Active sessions
LIST OF ACTIVE SESSIONS is a tool for monitoring and disconnecting active sessions. A session means entering your personal account at a certain time, from certain IP addresses, and from a specific browser. Here you can close any session, and further login without re-entering the login / password for this session will be impossible. It is used as an additional security measure.
Notifications settings
In these settings, you can specify which communication channel for which events is best to receive notifications.
Here is a set with checkboxes , where you can choose the desired notification method to choose from: by email, by SMS, using the Telegram bot, or Push - browser notifications (you can choose one or several methods at the same time). To activate Telegram, you need to start a conversation with XServerCloudBot and log in there as a user, for this there is a direct Telegram link for activation.
If you have enabled browser notifications, then follow this instructions to enable the display of notifications by our site.
If you keep the situation with your servers under control or for some other reason do not want to receive notifications at all - there is a "silent mode" for this - the "Disable all notifications" checkbox. You will still receive abuse notifications to your primary email address.
In the "Financial settings" subsection, you can configure the notification period for the upcoming server expiration. Here you can choose how many days you need to send a reminder, there is a period from 1 to 14 days before the server expires. You will receive one reminder at the specified time, and then a warning on the day the server expires. If the server remains unpaid, you will receive alerts every day until the server is canceled.
Enabling PUSH Notifications for Various Browsers
To enable browser push notifications:
Google Chrome:
In the browser address bar, click on the lock icon![]() , and in this menu the "Notifications" section - select "Allow"
, and in this menu the "Notifications" section - select "Allow"
Mozilla Firefox:
- Click the icon
 to call up the Control Center.
 - Click the arrow in the tooltip.
- Click Details to open the Page Information window.
- Click on the "Permissions" tab.
- Under "Send notifications", select the "Allow" notification option. If options are grayed out, uncheck the box next to use default.
Safari:
- Open the Safari application.
- Select the menu bar "Safari" -> "Settings".
- Go to the "Websites" section, and then to the "Notifications".
- In the list of sites, find "Xserver Cloud" and select "Allow"